ReplyWink documentation
Getting started with ReplyWink
ReplyWink helps you decide which posts to reply to and draft a response in your own voice. Start on X (Twitter): connect your own AI provider, finish setup, and click a ReplyWink reason bar beneath a highlighted post. Every reply is reviewed, copied, and posted by you.
On this page
Before you start
- Use Chrome on a computer and sign in to the X account you normally browse with.
- Have an API key from an AI provider and access to a model that works with the chosen API format. A ReplyWink license key is a different credential.
- You can start without buying a license. The free plan includes unlimited post scoring and five draft generations per rolling 24 hours. AI provider charges are separate.
Reddit currently supports post scoring and reason bars, but not the inline reply workflow described below. See Reddit support and limitations.
1. Install and open settings
Install ReplyWink from the official Chrome Web Store listing. Pin the extension if you want quick access. Open its side panel from the toolbar, then select Settings. You can also open the extension’s Options page through Chrome’s extension menu.
The side-panel shortcut is Ctrl + Shift + A on Windows/Linux or ⌘ + Shift + A on macOS. If another command owns the shortcut, use the toolbar button instead.
2. Save and connect an AI provider
New users land in ReplyWink Setup. Its first step, Connect AI, contains the same provider editor as the Model settings tab.
- Add a provider and choose OpenAI, DeepSeek, Anthropic, or Custom.
- Enter your API key and an exact model ID available to your provider account. For a custom provider, also set the provider address and API format.
- Use Test connection if you want to check the entered details without saving.
- Select Save and connect. Wait for a successful response and confirm the profile is active.
Test connection leaves the form unsaved. Save and connect validates the connection, saves the profile, and makes it active. See the complete provider guide if the connection fails.
3. Tell ReplyWink what matters to you
The AI-assisted setup has four steps: Connect AI, Analyze X account, Your intent, and Confirm setup. Enter your X handle, choose Analyze, select your intent, and generate a proposed setup. Review it before selecting Enable.
During account analysis, ReplyWink briefly opens your X profile using your existing signed-in browser session. It reads your bio and visible recent posts; the analysis request goes to your configured AI provider. You do not give ReplyWink your X password.
You can use manual setup instead. Fill in account positioning, products, goals, thresholds, and your search playbook. Be specific: “I build scheduling tools for independent consultants” gives scoring more useful context than “I want more engagement.” After setup, Edit manually lets you refine these choices.
4. Draft your first reply on X
- Open or refresh X, then browse your feed or search results.
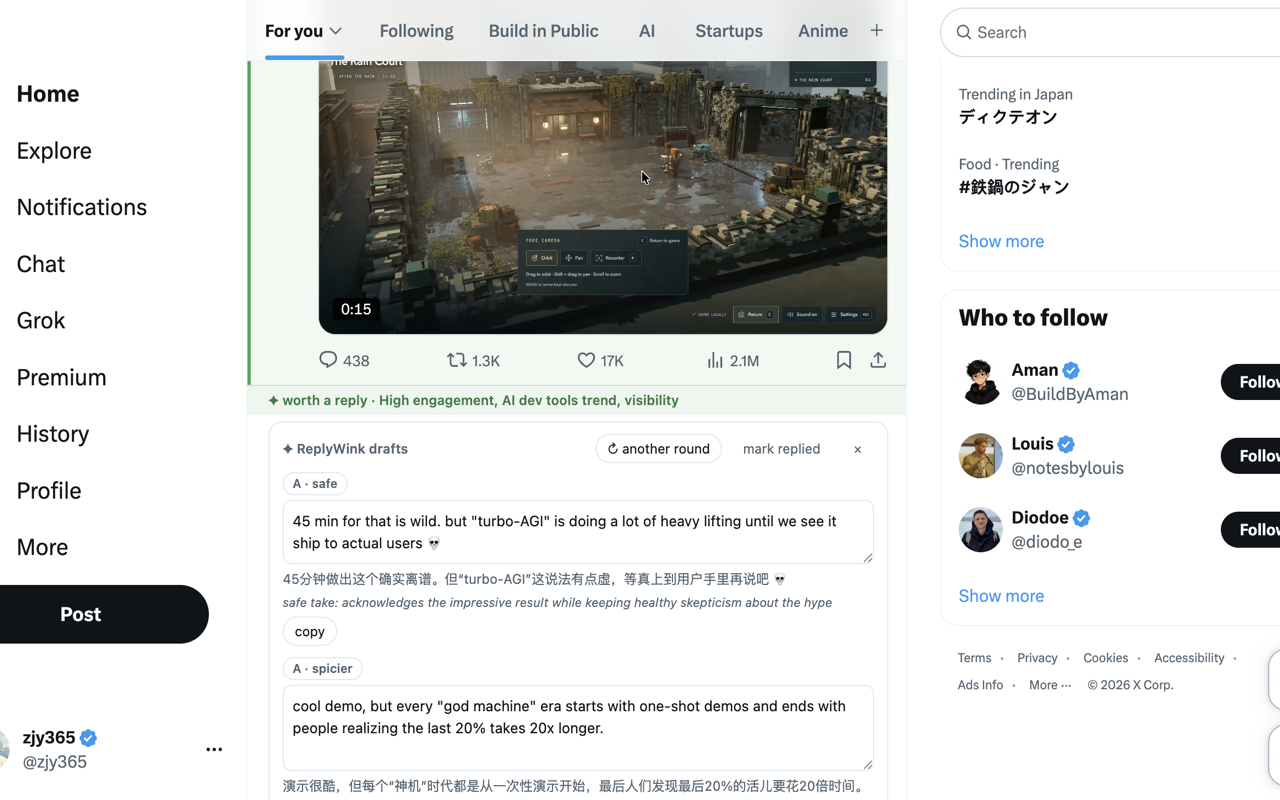
- Look for a highlighted post with a ReplyWink bar such as worth a reply or maybe. Read the accompanying reason and the original post.
- Click the bar. The draft card opens beneath the post and generates two reply options.
- Read both options, check their claims, and edit the wording. Click copy on the reply you want.
- Paste it into X yourself and post only when satisfied. Return to the card and select mark replied after sending.
5. Check your progress
Open the side panel for your daily reply goal, playbook search links, and recent copied/replied items. Generate drafts from the X reason bar, rather than looking for a draft editor in the side panel. Your daily reply goal is separate from the free plan’s draft-generation allowance.
If nothing appears
Confirm that setup is complete and a provider is active, then refresh the X tab. Posts may be excluded by your minimum engagement, age limit, author cooldown, or replied history. Browse a few relevant root posts before assuming the extension has failed. If drafts show an API error, follow provider troubleshooting. For a repeatable issue, contact support with your extension version and a redacted error message.